


What is SSH Protocol?
Nowadays by improving the technology, many protocols were created, but it is really important that you used the protocol that is secure method and you can send or receive information through computer over server.
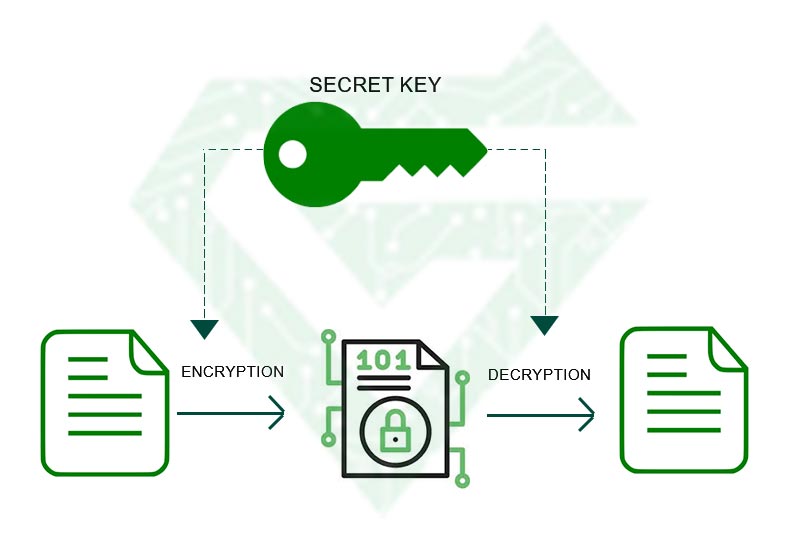
Because of this, invented encrypt protocols that for read it needs to decryption. SSH is one of them that is really secure. In this article, we want to introduce this protocol and survey features of it.
What is SSH Protocol?
SSH (Secure Shell or Secure Socket Shell) is a cryptographic network protocol used to securely access and manage network equipment and servers over an unsecured network. It provides a secure channel for remote command-line login, file transfer and other secure network services between two computers.
This protocol is used for controlling server remotely, managing infrastructure and transforming files. SSH protocol allows managers control and manage servers and devices from afar. SSH is used by network administrators to handle systems and devices remotely.
When an employer wants to travel, maybe gave to his employees some instructions that will be able to control them remotely. This example is similar to SSH protocol. SSH provides strong password and public key because of that this is safe protocol to transfer data between devices. What is the different between this protocol and older remote protocol like Telnet?
Now pay attention to this instance, when employer traveled and call to his employees to give them some instruction, they put the phone on speaker and all people there can hear the private instructions and there is no secure way to transmit information. This example can show you how telnet protocol works.
Read more: What is SD-WAN protocol and how does it work
Key Features of SSH:
- Encryption: SSH encrypts all data exchanged between the client and the server, preventing eavesdropping and man-in-the-middle attacks.
- Authentication: Supports multiple authentication methods, including password-based authentication and public-key authentication.
- Port Forwarding (Tunneling): Can securely tunnel other protocols, such as HTTP or FTP, through an SSH connection.
- File Transfer: Supports secure file transfer via SCP (Secure Copy Protocol) and SFTP (SSH File Transfer Protocol).
- Remote Command Execution: Allows executing commands on a remote machine securely.
How does SSH Protocol Work?
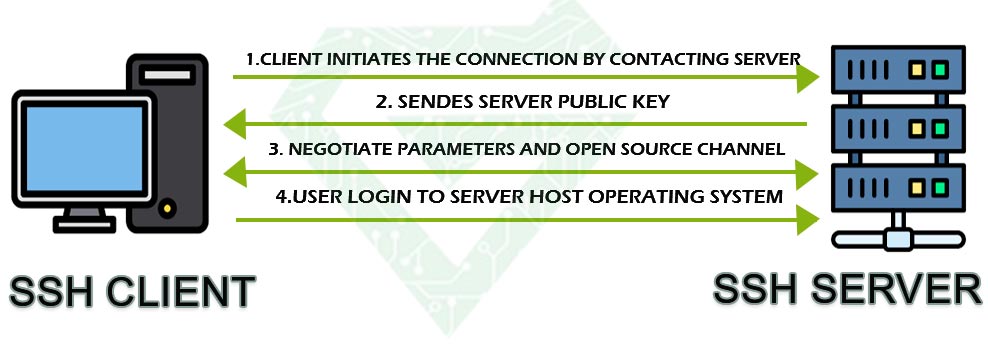
We surely can say, the SSH protocol created to replace this protocol with the older ones such as Telnet, Remote Shell (RSH) or Remote Login (Rlogin). In addition, you can use SSH protocol instead of some file transfer program such as File Transfer Protocol (FTP) or Remote Copy (RCP). Steps of SSH work explain at the rest.
- A client initiates a connection to an SSH server.
- The server and client perform a handshake to establish a secure, encrypted connection.
- The client authenticates itself using a password or a cryptographic key.
- Once authenticated, the client can execute commands, transfer files, or set up tunnels.
Some Common SSH Commands:
- Connect to a server:
ssh user@hostname
- Copy files using SCP:
scp file.txt user@hostname:/path/to/destination
- Use SFTP for file transfer:
sftp user@hostname
Uses of SSH Protocol:
SSH (Secure Shell) has several advantages, making it the preferred protocol for secure remote access and communication over an unsecured network. Here are its key benefits:
- Strong Security & Encryption
- Encrypts all data transmitted between client and server, preventing unauthorized access, data leaks, and interception by attackers.
- Uses strong cryptographic algorithms such as AES, RSA, and ECC.
- Secure Remote Access
- Allows users to securely access and control remote servers, making it ideal for system administration and troubleshooting.
- Authentication Methods
- Supports password-based authentication and more secure public key authentication.
- Can integrate with multi-factor authentication (MFA) for added security.
- Port Forwarding (Tunneling)
- Can tunnel other protocols (e.g., HTTP, FTP, RDP) securely over an SSH connection, protecting sensitive data.
- File Transfer Capabilities
- Supports SCP (Secure Copy Protocol) and SFTP (SSH File Transfer Protocol) for encrypted file transfers.
- Integrity and Protection Against Attacks
- Prevents man-in-the-middle (MITM) attacks and ensures data integrity with message authentication codes (MACs).
- Protects against brute force attacks through fail2ban, key-based authentication, and disabling password logins.
- Automated Tasks & Scripting
- Can be used in scripts to automate administrative tasks like backups and deployments.
- Works well with tools like Ansible, Puppet, and Chef for server automation.
- Cross-Platform Compatibility
- Available on Linux, macOS, and Windows (via OpenSSH or third-party tools like PuTTY).
- Lightweight & Fast
- Uses minimal system resources while providing strong security, making it efficient for both local and cloud environments.
- Access Control & User Management
- Allows configuring user roles, permissions, and access control through configuration files like ~/.ssh/authorized_keys.
Comparing SSH Protocol and Telnet Protocol:
Here’s a comparison between SSH (Secure Shell) and Telnet, highlighting their key differences in terms of security, functionality, and usage:
| Feature | SSH (Secure Shell) | Telnet |
|---|---|---|
| Security | Highly Secure (Encrypts all data using cryptographic algorithms) | Not Secure (Sends data, including passwords, in plaintext) |
| Encryption | Uses strong encryption (AES, RSA, ECC, etc.) to secure communication | No encryption (data can be intercepted and read easily) |
| Authentication | Supports password authentication, public key authentication, and multi-factor authentication (MFA) | Only supports simple username-password authentication (plaintext) |
| Default Port | Port 22 | Port 23 |
| Data Integrity | Uses hashing algorithms (e.g., SHA-2, HMAC) to prevent data tampering | No data integrity checks |
| Remote Access | Secure remote access to servers and devices | Unsecured remote access, vulnerable to eavesdropping |
| File Transfer Support | Supports SCP (Secure Copy Protocol) and SFTP (SSH File Transfer Protocol) | No file transfer capabilities |
| Port Forwarding | Supports secure tunneling for other protocols (e.g., HTTP, FTP, RDP) | No support for port forwarding |
| Vulnerability to Attacks | Resistant to MITM (Man-in-the-Middle), brute force, and eavesdropping attacks | Highly vulnerable to packet sniffing, MITM attacks, and credential theft |
| Usage Scenario | Preferred for secure remote administration, file transfers, and automation | Mostly obsolete; used in controlled or legacy environments |
| Platform Support | Works on Linux, macOS, Windows (via OpenSSH, PuTTY, etc.) | Works on older Unix/Linux systems but rarely used today |
Which One Should You Use?
- Use SSH for secure remote access, file transfers, and automation.
- Avoid Telnet unless working in a closed, controlled environment where security is not a concern (e.g., legacy systems with no internet exposure).
Read More: Definition of Telnet
Installation of SSH Protocol:
Would you like a step-by-step guide to setting up SSH on your system?
Step 1: Install SSH
For Linux/macOS (SSH is usually pre-installed):
- Check if SSH is installed:
ssh -V
If it’s installed, you’ll see a version number like:
OpenSSH_8.9p1, OpenSSL 1.1.1n
- If SSH is missing, install it:
-
- Debian/Ubuntu:
sudo apt update && sudo apt install openssh-server -y
-
- CentOS/RHEL:
sudo yum install openssh-server -y
-
- macOS: SSH is built-in, so no installation is needed.
- Start and enable the SSH service:
sudo systemctl enable –now ssh
- Verify SSH is running:
sudo systemctl status ssh
For Windows:
Windows now includes OpenSSH by default (Windows 10 & 11). To check:
- Open PowerShell and run:
powershell
ssh
If SSH is not found, install it:
powershell
Add-WindowsFeature -Name OpenSSH-Server
- Start and enable the SSH service:
powershell
Start-Service sshd
Set-Service -Name sshd -StartupType Automatic
Alternatively, you can use PuTTY as an SSH client.
Step 2: Connect to a Remote Server
Use this command to connect to a remote SSH server:
ssh username@remote-server-ip
Example:
- If prompted, type “yes” to accept the server fingerprint.
- Enter your password when asked.
Step 3: Secure SSH Access (Optional but Recommended)
- Disable root login (for security):
sudo nano /etc/ssh/sshd_config
Find this line:
nginx
PermitRootLogin yes
Change it to:
nginx
PermitRootLogin no
Save and exit (CTRL+X, Y, Enter).
- Change the SSH port (optional for extra security):
sudo nano /etc/ssh/sshd_config
Find:
#Port 22
Change it to a custom port (e.g., 2222):
yaml
Port 2222
Restart SSH:
sudo systemctl restart ssh
Step 4: Set Up SSH Key-Based Authentication (More Secure Than Passwords)
- Generate an SSH Key on Your Local Machine:
ssh-keygen -t rsa -b 4096
Press Enter for the default location (~/.ssh/id_rsa) and set a passphrase (optional).
- Copy the Public Key to the Remote Server:
ssh-copy-id username@remote-server-ip
Or manually copy the key:
cat ~/.ssh/id_rsa.pub
Then, paste it into the remote server’s ~/.ssh/authorized_keys file.
- Disable Password Authentication (optional, for security):
sudo nano /etc/ssh/sshd_config
Find:
nginx
PasswordAuthentication yes
Change it to:
nginx
PasswordAuthentication no
Restart SSH:
sudo systemctl restart ssh
Step 5: Transfer Files Securely with SCP & SFTP
- Copy a file to a remote server:
scp file.txt username@remote-server-ip:/remote/directory/
- Copy a file from the remote server:
scp username@remote-server-ip:/remote/file.txt .
- Use SFTP for file management:
sftp username@remote-server-ip
Inside SFTP, use commands like ls, get filename, and put filename to transfer files.
When do we use SSH Protocol?
SSH (Secure Shell) is used in various situations where secure remote access, file transfer, or command execution is required. Here are some common use cases:
- Remote Server Access: To securely connect to remote servers or computers over an encrypted network connection (e.g., ssh user@server_ip).
- Secure File Transfers: Using SCP (Secure Copy Protocol) or SFTP (SSH File Transfer Protocol) to transfer files securely between machines (e.g., scp file.txt user@server:/path/).
- Tunneling and Port Forwarding: To securely tunnel network traffic, such as accessing a database or web service running on a remote machine without exposing it to the public.
- Automated Scripts and Remote Execution: Running scripts or commands on remote machines without manual login, often using SSH keys.
- Git and Version Control: Many platforms like GitHub, GitLab, and Bitbucket use SSH keys for authentication to securely push or pull code repositories.
- Secure Proxy or VPN Alternative: SSH can be used to create an encrypted proxy connection for browsing securely.
- Managing IoT Devices and Embedded Systems: Connecting securely to Raspberry Pis, network routers, and other embedded systems.
What are SSH Keys:
SSH keys are a pair of cryptographic keys used for secure authentication in SSH (Secure Shell) connections. They replace traditional password-based authentication with a more secure and automated method.
How do SSH Keys Work?
- Key Pair Generation: You generate a pair of keys:
- Public Key: Can be shared with anyone (placed on the server).
- Private Key: Kept secret and stored on your local machine.
- Authentication Process: When you attempt to log in via SSH, the server checks your public key against your private key. If they match, access is granted, no password needed!
Why do we need to use SSH keys?
- More Secure: Eliminates brute-force attacks on passwords.
- Convenient: No need to type a password every time.
- Automatable: Useful for scripts and automation.

How to Set Up SSH Keys (Step-by-Step):
1.Generate SSH Key Pair
Run this command on your local machine:
ssh-keygen -t rsa -b 4096 -C “[email protected]”
- -t rsa → Specifies RSA encryption.
- -b 4096 → Sets key size (bigger = more secure).
- -C “email” → Adds a comment (useful for identifying keys).
Press Enter to save it in the default location (~/.ssh/id_rsa).
2.Copy the Public Key to the Server
Run this command to transfer your public key:
ssh-copy-id user@server_ip
Alternatively, you can manually copy it:
cat ~/.ssh/id_rsa.pub
Then paste it into the ~/.ssh/authorized_keys file on the server.
3.Test SSH Login
Now try logging in:
ssh user@server_ip
If everything is set up correctly, you should be logged in without entering a password!
Bonus: Secure Your SSH Setup
- Disable Password Authentication (forces SSH key usage):
Edit /etc/ssh/sshd_config on the server:
nginx
PasswordAuthentication no
Restart SSH:
sudo systemctl restart ssh
- Use a Passphrase: Adds an extra security layer to your private key.
- Use ssh-agent: Stores your private key in memory for easier access.
Conclusion:
SSH Protocol is one of the secure protocols that you can use it for sending information. SSH provides high security as encrypts all messages of communication between clients and server. In this article we tried to cover all aspects of this protocol.
If this post is useful for you, can follow our posts in Atech Blogs. Atech is a kind of online shop that you can buy network equipment with warranty in it. if you have any questions about network equipment, call us.